Digi Storage pe iOS
Noţiuni de bază cu Digi Storage pe iPhone/iPad
Digi Storage vă permite să:
Utilizaţi dispozitivele de la Apple pentru a accesa și partaja fișiere stocate pe smartphone, tableta, computere sau în cloud-ul Digi Storage. Puteţi chiar să integraţi conturi provenite de la alţi furnizori de servicii cloud, cum ar fi DropBox, Google Drive sau One Drive.
Prin Digi Storage puteţi să uploadaţi sau să downloadaţi filme, fotografii, melodii sau orice alt fișier și să protejaţi cu parolă link-urile de upload sau de download generate pentru partajarea datelor, maximizând astfel securitatea datelor dumneavoastră.
Noţiuni de bază:
Descărcaţi aplicaţia Digi Storage iOS de pe App Store
Instalaţi aplicaţia Digi Storage pe iPhone/iPad
Faceţi click
 pentru a lansa aplicaţia Digi Storage
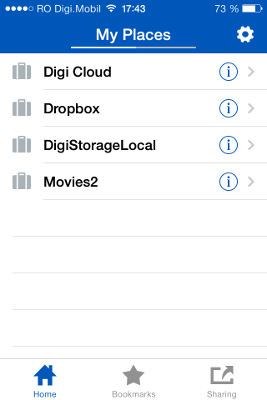
Introduceţi datele de conectare (username-ul și parola Digi Storage)
Puteţi accesa setările dumneavoastră de profil facând click pe
 situată în colţul din dreapta sus al ecranului
Pentru a vă întoarce în secţiunea anterioară, faceţi click pe butonul

Pentru a accesa rădăcina structurii de directoare, faceţi click pe


Ce tipuri de fișiere și documente pot fi vizualizate din Digi Storage pe dispozitivele Apple?
Digi Storage permite vizualizarea celor mai comune fișiere pentru fotografii, videoclipuri și documente.
Vizualizarea fotografiilor din Digi Storage pe telefon sau tabletă:
Deschideţi un director care conţine fișiere foto
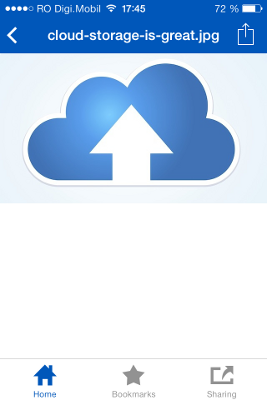
Dacă faceţi click pe un fisier foto, fișierul selectat va fi afișat pe tot ecranul

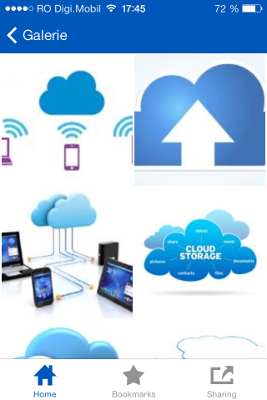
Pentru a vizualiza fotografiile în mod galerie, faceţi click pe  apoi faceţi click pe
  .
.

Opţiunea de auto upload a fotografiilor noi.
Cu Digi Storage puteţi transfera automat în cloud fotografiile noi pe care le creaţi. Nu mai este nevoie să faceţi upload manual la fiecare poză. Aplicaţia Digi Storage va face asta automat pentru dumneavoastră !
Faceţi click pe
 apoi faceţi click pe
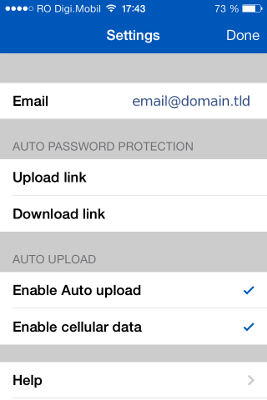
Pentru activarea opţiunii de auto upload a pozelor noi, faceţi click pe optiunea Enable Auto Upload
Implicit se va utiliza conexiunea Wi-Fi, iar dacă doriţi să se utilizeze și conexiunea de date mobile faceţi click pe
Enable cellular data* pentru activare
Pentru confirmare faceţi click pe


La prima activare a opţiunii Enable Auto Upload se vor copia, ca măsură de siguranţă, în folderul Digi Cloud / My iOS Media din cloud-ul Digi Storage toate fotografiile și toate clipurile salvate în memoria dispozitivului iOS. Ulterior, aplicaţia reţine ultima poză transferată și se vor uploada numai pozele noi.
Din cauza restricţiilor sistemului de operare iOS, fotografiile noi se uploadează automat doar atunci când se accesează aplicaţia Digi Storage.
Schimbarea limbii de afișare
Aplicaţia Digi Storage rulează implicit în limba utilizată pe dispozitivul iOS. Pentru a schimba limba de afișare urmaţi pașii de mai jos:
- accesaţi meniul dispozitivului si faceţi click pe "Settings" -> "General" -> "International" -> "Language"
Crearea de directoare și organizarea datelor în Digi Storage
Crearea unui director nou:
Faceţi click pe
 situată în colţul din dreapta sus al ecranului
Din meniul afișat faceţi click pe

Introduceţi numele noului director și faceţi click pe

După ce a fost creat, puteţi redenumi, muta, copia sau șterge fișiere pentru un acces mai ușor și mai intuitiv la datele dumneavoastră.
Organizarea datelor stocate în Digi Storage
Dacă doriţi să redenumiţi fișiere sau directoare folosind un dispozitiv Apple, Digi Storage vă permite să faceţi asta cu doar câteva operaţii simple.
Redenumirea unui fișier sau a unui director:
Selectaţi fișierul sau directorul pe care doriţi să-l redenumiţi
Trecând cu degetul de la stânga la dreapta pe numele fișierului, se va deschide un meniu cu mai multe opţiuni
Faceţi click pe

În fereastra afișată tastaţi noul nume pentru fișierul sau directorul pe care doriţi să-l redenumiţi
Faceţi click pe
 pentru confirmare
Cum uploadaţi fotografii folosind un dispozitiv Apple?
În Digi Storage puteţi transfera și partaja cu ușurinţă fotografiile dumneavoastră, ca de altfel orice fel de fișier. Fotografiile pe care le uploadaţi sunt stocate în cloud și sunt disponibile pentru dumneavoastră oriunde, oricând. Le puteţi accesa chiar de pe alte platforme, cum ar fi Mac OS, Windows, Linux sau Android.
Uploadul fotografiilor în Digi Storage:
Accesaţi directorul din contul Digi Storage în care doriţi să transferaţi fotografiile
Faceţi click pe butonul
 aflat în colţul din dreapta sus al ecranului
În fereastra afișată, faceţi click pe butonul

Veţi fi transferat în meniul albumelor foto
Alegeţi fotografiile pe care doriţi să le transferaţi facând click pe ele
În dreptul fotografiilor selectate va fi afișată iconiţa

Când aţi terminat de selectat fotografiile, faceţi click pe butonul

În timp ce pozele sunt transferate, va fi afișat un indicator al progresului operaţiunii, iar când dispare acest indicator înseamnă că fotografiile au fost stocate în siguranţă în cloud
Ce înseamnă partajarea unui director în Digi Storage?
Partajarea unui director permite prietenilor sau persoanelor pe care le selectaţi să acceseze datele stocate în Digi Storage pe care dumneavoastră decideţi că le pot accesa.
Partajarea directoarelor în Digi Storage
Alegeţi un director și o persoană cu care doriţi să-l partajaţi:
Selectaţi sau creaţi un director pe care doriţi să-l partajaţi
Accesaţi meniul opţiunilor directorului respectiv trecând degetul de la stanga la dreapta pe el
În meniul afișat, faceţi click pe iconiţa

Faceţi click pe

Se va deschide o fereastră în care sunt listaţi membrii grupului dumneavoastră. Dacă nu aţi partajat încă niciun fisier, grupul dumneavoastră va fi gol
Puteţi adăuga persoane noi facând click pe iconiţa
 situată în partea dreaptă a secţiunii superioare
Tastaţi e-mailul de autentificare la Digi Storage a persoanei respective pentru a iniţia partajarea
În fereastra “Add person” puteţi seta permisiunile. Pur și simplu faceţi click pe permisiunea pe care doriţi să o setaţi pentru o persoană anume și imaginea alăturată
 va fi afișată alături de permisiune
Când aţi terminat de adăugat persoana, faceţi click pe butonul

Puteţi adăuga mai multe persoane facând click pe iconiţa
 aflată în partea dreaptă a secţiunii superioare pentru fiecare persoană în parte pe care doriţi să o adăugaţi
Directorul este acum partajat
Puteţi accesa și edita sau șterge partajarea facând click pe butonul
 situat în colţul din dreapta jos al ecranului.
În fereastra de partajare, faceţi click pe iconiţa
  de lângă numele fișierului partajat pentru a accesa lista persoanelor cu care aţi partajat directorul.
Cum pot șterge fișiere, foldere sau partajări din Digi Storage?
Dacă doriţi să ștergeţi un fișier sau un director:
Accesaţi meniul opţiunilor fișierului sau al directorului trecând cu degetul deasupra lui de la stânga la dreapta
Faceţi click pe iconiţa

Faceţi click pe butonul
 pentru confirmare
Dacă doriţi să ștergeţi partajarea unui director:
Faceţi click pe iconiţa
 situată în colţul din dreapta jos al ecranului. În meniul afișat, treceţi cu degetul de la dreapta la stanga peste numele lui și faceţi click pe

Dacă doriţi să ștergeţi o singură persoană din meniul afișat, faceţi click pe
 de lângă numele partajării
În meniul afișat, treceţi cu degetul de la dreapta la stânga peste numele utilizatorului și faceţi click pe

Ce tipuri de link-uri pot crea și ce înseamnă ele?
În Digi Storage puteţi crea doua tipuri de link-uri:
1. Link-ul de Download
Link-ul de Download îi permite unei terţe persoane să downloadeze un fișier sau un director din contul dumneavoastră Digi Storage chiar dacă nu este un utilizator Digi Storage. Link-ul este creat și poate fi trimis prin e-mail, facebook, twitter sau SMS.
Crearea unui link de download:
Selectaţi fișierul sau directorul pentru care doriţi să creaţi link-ul de download
Accesaţi meniul opţiunilor trecând cu degetul de la stânga la dreapta pe fișier sau pe director.
Faceţi click pe iconiţa

Dacă aţi facut click pe iconiţa
 din partea dreaptă a fișierului, o fereastră se va deschide direct oferindu-vă multiple metode de transmitere a link-ului
Dacă aţi facut click pe iconiţa
 de lângă un director, faceţi click pe
  din meniul afișat
O fereastră se va deschide apoi oferindu-vă multiple metode de transmitere a link-ului
Selectaţi metoda dorită pentru partajarea link-ului de download (cea mai comună este e-mailul sau SMS-ul).
Digi Storage va deschide implicit aplicaţia și va crea link-ul de download în aplicaţia selectată. Introduceţi informaţiile de contact ale persoanei selectate (de exemplu, adresa de e-mail) și trimiteţi link-ul de download
Puteţi face click pe
 din meniu pentru a copia URL-ul link-ului și pentru a face apoi “paste” cu link-ul creat oriunde doriţi
2. Link-ul de Upload
Link-ul de Upload îi permite unei terţe persoane să uploadeze fișiere în directorul ales de dumneavoastră din Digi Storage chiar dacă nu este un utilizator Digi Storage. Link-ul este creat și poate fi trimis prin e-mail, facebook, twitter sau SMS.
Crearea unui link de upload:
Selectaţi directorul pentru care doriţi să creaţi link-ul de upload
Accesaţi meniul opţiunilor trecând cu degetul de la stanga la dreapta pe director
Faceţi click pe

Faceţi click pe iconiţa

O fereastră se va deschide oferindu-vă multiple metode de transmitere a link-ului
Selectaţi metoda dorită pentru partajarea link-ului de upload (cea mai comună este e-mailul sau SMS-ul)
Digi Storage va deschide implicit aplicaţia și va crea link-ul de upload în aplicaţia selectată. Introduceţi informaţiile de contact ale persoanei selectate (de exemplu, adresa de e-mail) și trimiteţi link-ul de upload
Puteţi face click pe
 din meniu pentru a copia URL-ul link-ului și pentru a face apoi “paste” cu link-ul creat oriunde doriţi
Ce face marcarea unui director (bookmark) în Digi Storage?
Digi Storage are o opţiune pentru marcarea datelor ca 'semne de carte', numită “Bookmark”. Acest lucru vă permite să accesaţi rapid cele mai utilizate fișiere. Este exact același mecanism folosit și în browserul de internet pentru accesarea rapidă a celor mai vizitate URL-uri.
Marcarea unui director:
Alegeţi un director pe care doriţi să-l marcaţi
Accesaţi meniul opţiunilor trecând cu degetul deasupra lui de la stânga la dreapta
Faceţi click pe
 în meniul afișat
Când iconiţa devine gri, marcajul a fost salvat în

După salvarea marcajului, puteţi să-l accesaţi facând click pe  din mijlocul secţiunii inferioare a ecranului.
Protejarea cu parolă a link-urilor de download sau de upload în Digi Storage
Digi Storage vă permite să protejaţi cu parolă toate link-urile de download sau de upload generate. Astfel, vă asiguraţi că accesul la datele dumneavoastră din cloud se face numai de către persoanele autorizate.
Protejarea cu parolă a link-urilor de download sau de upload:
Faceţi click pe iconiţa
 aflată în partea stângă a secţiunii inferioare a ecranului
Faceţi click pe iconiţa
 situată în colţul drept al ecranului
Dacă doriţi ca link-urile dumneavoastră să fie protejate, pur și simplu asiguraţi-vă că este bifată caseta
 de lângă link-ul pe care doriţi să-l protejaţi
În cazul în care este bifată caseta, parola este trimisă automat împreună cu link-ul creat
Adăugarea de comentarii și menţionarea fișierelor
În plus faţă de accesarea, partajarea și stocarea fișierelor de oriunde aţi fi, Digi Storage vă permite să trimiteţi comentarii și să menţionaţi fișiere. Practic, este un mic sistem intern de chat prin care puteţi trimite observaţii legate de fișierele partajate.
Adăugarea unui comentariu:
Faceţi click pe butonul
 din colţul drept al ecranului
Faceţi click pe butonul
 .
.Introduceţi comentariul în caseta text din fereastra de comentarii
Faceţi click pe butonul Send.
Comentariul dumneavoastră va fi afișat pe wall-ul “Comments”. Aici puteţi vedea comentariile de la toţi utilizatorii cu care partajaţi un director
Menţionarea unui fișier:
Accesaţi meniul opţiunilor trecând cu degetul de la stanga la dreapta pe director sau pe fișier
Faceţi click pe iconiţa

Introduceţi comentariul în caseta text. În acest moment veţi observa că menţionarea fișierului se introduce automat în faţa comentariului
Când aţi terminat de tastat comentariul, faceţi click pe butonul Send