Aplicaţia Desktop și sincronizarea în Digi Storage
Prin aplicaţia dedicată PC-urilor se realizează sincronizarea datelor între cloud-ul Digi Storage și unul sau mai multe directoare de pe PC-ul dumneavoastră. Toate datele pe care le puneţi în aceste directoare se vor transfera AUTOMAT în cloud, fără nicio altă intervenţie din partea dumneavoastră. De îndată ce au ajuns în cloud, datele pot fi accesate de pe orice dispozitiv care are aplicaţia Digi Storage instalată, fie el dispozitiv fix sau mobil.
Aplicaţia Digi Storage pentru Windows
Pentru a începe accesarea și sincronizarea datelor de pe PC în cloud-ul Digi Storage, trebuie să instalaţi mai întâi clientul desktop pentru Windows.
Descărcarea clientului desktop Digi Storage:
Conectaţi-vă la aplicaţia web Digi Storage.
În mijlocul meniului vertical veţi observa optiunea "Link this computer" pe care trebuie să faceţi click.
Faceţi click pe "Download" aflată sub Connect your computer.

Dacă doriţi să alegeţi manual sistemul de operare faceţi click pe link-ul "Show other operating systems".
Dacă veţi primi eroarea
 , faceţi click dreapta pe săgeata din dreapta butonului "Discard"
  și selectaţi opţiunea Keep.
Când se termină downloadul, rulaţi aplicaţia de instalare.
Dacă vi se va afișa fereastra de avertizare "User Account Control", faceţi click pe butonul Yes pentru a permite aplicaţiei Digi Storage să instaleze componentele necesare pe computerul dumneavoastră.
Când va fi afișată fereastra "Digi Storage Setup", faceţi click pe "Next".
Faceţi click din nou pe "Next" în a doua fereastră afișată în care puteţi alege componentele Digi Storage pe care doriţi să le instalaţi.
Faceţi click pe "Install" și așteptaţi să se finalizeze instalarea aplicaţiei.
##Sincronizarea datelor cu Digi Storage
Prin sincronizarea fișierelor între PC-ul dumneavoastră și cloud-ul Digi Storage, vă asiguraţi tot timpul protecţia datelor importante în cazul în care întâmpinaţi o problemă hardware cu PC-ul. De asemenea, reprezintă și o metodă de a face disponibile datele respective pe toate dispozitivele dumneavoastră pe care aveţi instalată aplicaţia Digi Storage corespunzatoare.
Sincronizarea fișierelor și a directoarelor:
Faceţi dublu click pe iconiţa "Digi Storage" de pe Desktop.
Pagina aplicaţiei desktop Digi Storage va fi afișată în interfaţa proprie.
Faceţi click pe link-ul "Click to add a sync" din secţiunea Syncs. De asemenea, puteţi adăuga o nouă sincronizare făcând click pe
 .
.Selectaţi directorul pe care doriţi să-l sincronizaţi, de exemplu Downloads, Desktop sau orice alt director și faceţi click pe "Next".
ATENTIE! nu este recomandat să sincronizaţi întreaga partiţie a sistemului de operare (de regula C:) sau orice director de sistem al Windows-ului deoarece modificarea sau ștergerea unui astfel de director poate duce la blocarea sistemului de operare!
Selectaţi destinaţia din cloud cu care se va sincroniza directorul local de pe computerul dumneavoastră.
După ce selectaţi destinatia din cloud, faceţi click pe "Next" apoi pe "Finish" la ultimul pas.
Acum aţi terminat operaţiunea de sincronizare. De acum încolo, toate fișierele pe care le veţi copia în directorul local vor fi sincronizate AUTOMAT cu directorul din cloud și invers, toate fișierele copiate în directorul din cloud se vor regasi și pe PC.
Dacă veţi copia un fișier în directorul local ales pentru sincronizare, acest fișier va fi uploadat imediat în cloud. Când copiaţi un fișier în directorul din cloud din interfaţa web sau de pe alt dispozitiv decât computerul dumneavoastră, sincronizarea dintre cloud și PC începe în maxim 5 minute.
Gestionarea sincronizărilor
Puteţi opri, șterge sau verifica starea fișierelor sincronizate.
Oprirea sincronizării :
Faceţi click pe iconiţa
 .
.Iconiţa
 se va schimba cu
  .
.Pentru a reporni sincronizarea, faceţi click pe iconiţa
 .
.
Ștergerea sincronizării :
Faceţi click pe iconiţa
 .
.Apoi faceţi click pe iconiţa
 .
.
Verificarea sincronizării :
- Faceţi click pe iconiţa
 .
.
**ATENTIE! La crearea unei sincronizări noi, asiguraţi-vă că directorul din Digi Storage cu care faceţi sincronizarea este gol și nu conţine alte fișiere vechi care există și pe PC. NU ștergeţi o sincronizare ca apoi să o creaţi din nou cu aceleași directoare vechi !! Dacă directorul din Digi Storage cu care faceţi sincronizarea conţine deja toate sau o parte din fișierele din directorul local de pe PC, vor apărea erori sau conflicte în procesul de sincronizare !
Funcţia "Add Place"
Sincronizarea datelor între PC și cloud este o funcţie foarte utilă dar poate fi consumatoare de timp în cazul unor cantităţi foarte mari de date. De obicei, se aleg pentru sincronizare datele pe care le consideraţi foarte importante pentru dumneavoastră si a căror siguranţă este critică. Cum ar fi însă dacă putem face să apară în cloud și cei câţiva Terrabytes de pe hard-disk-ul dumneavoastră extern ? Sau cele câteva sute de Gigabytes de pe hard-disk-ul PC-ului ? Și cum ar fi dacă toate datele astea pot apărea în cloud în câteva secunde fără să transferăm efectiv nimic în cloud și fără să consumăm din spaţiul de stocare achiziţionat ? Am putea partaja extrem de ușor cu alţi utilizatori orice fișier !
Aici intervine funcţia "Add Place" care permite maparea unui director de pe PC către un director din cloud. Atenţie - datele nu sunt transferate în cloud și sunt disponibile DOAR dacă aveţi PC-ul pe care se află directorul respectiv online. În rest, se pot efectua absolut orice operaţii de partajare (generare de link-uri de upload și de download, partajare cu alţi utilizatori Digi Storage) și de organizare (copiere, mutare, ștergere) de pe orice dispozitiv fix și mobil pe care se află instalată aplicaţia corespunzătoare Digi Storage.
Adăugarea unui director local în cloud-ul Digi Storage (fără sincronizare):
Faceţi dublu click pe iconiţa "Digi Storage" de pe Desktop.
Pagina aplicaţiei desktop Digi Storage va fi afișată în interfaţa proprie.
Faceţi click pe link-ul "Click to add new place" localizat în secţiunea
 .
.De asemenea, îl puteţi adăuga și făcând click pe
 din aceeași secţiune.
Selectaţi calea către directorul respectiv, de exemplu întreaga partiţie, directorul Desktop sau Downloads sau orice alt director și faceţi click pe "Next".
Vi se va cere să introduceţi un nume pentru noul director mapat către cloud. Acest nume va apărea în secţiunea My Places din meniul Digi Storage.
După ce introduceţi numele pentru noul director mapat către cloud, faceţi click pe "Next" apoi pe "Finish" la ultimul pas.
Acum aţi terminat de creat maparea directorului respectiv în cloud din aplicaţia web Digi Store. Puteţi accesa directorul respectiv de la orice alt computer sau dispozitiv mobil cu conexiune la internet.
Puteţi gestiona datele mapate în cloud în panoul Digi Storage la fel cum gestionaţi datele dumneavoastră sincronizate în cloud.
Gestionaţi maparea datelor locale către cloud-ul Digi Storage
La fel ca la directoarele sincronizate în cloud, se pot efectua și aici aceleași operaţii : oprire acces (pauză), ștergere, editare.
Oprirea accesului (pauză):
Faceţi click pe iconiţa
 .
.Iconiţa
 se va schimba cu
  .
.Pentru a reporni accesul, faceţi click pe iconiţa
 .
.
Ștergerea accesului :
Pentru început, trebuie oprit accesul făcând click pe iconiţa
 .
.Faceţi click pe iconiţa
 .
.
Editarea accesului :
Faceţi click pe iconiţa  .
.
Schimbarea limbii de afișare
Aplicaţia Digi Storage rulează implicit în limba română, iar dacă doriţi să schimbaţi limba de afișare urmaţi pașii de mai jos:
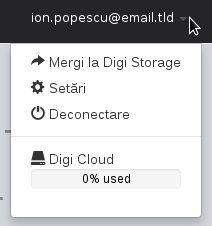
- Treceţi cu mouse-ul deasupra numelui dumneavoastră pentru a afișa meniul de mai jos

Faceţi click pe "Setări".
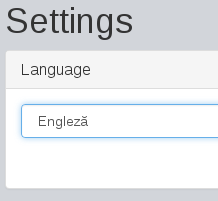
Alegeţi limba engleză din secţiunea Limbă

- Apoi faceţi click pe butonul Go back

Aplicaţia Digi Storage pentru Linux
Pentru a instala clientul desktop pentru Linux, procedaţi așa:
Conectaţi-vă la aplicaţia web Digi Storage.
În mijlocul meniului vertical veţi observa optiunea "Link this computer" pe care trebuie să faceţi click.
Faceţi click pe "Donwload" aflată sub Connect your computer.
Dacă doriţi să alegeţi manual sistemul de operare faceţi click pe link-ul "Show other operating systems".
Când se termină downloadul, extrageţi fișierele executabile ale aplicaţiei Digi Storage într-un folder. În acest folder veţi observa trei fișiere; aplicaţia se lansează rulând doar fișierul "storagegui", celelalte două fișiere sunt apelate de fișierul executabil "storagegui".
Accesaţi folderul în care aţi extras fișierele executabile Digi Storage și lansaţi aplicaţia din linie de comandă tastând "./storagegui" sau făcând dublu click cu mouse-ul pe fișierul "storagegui". Aplicaţia va porni în background și o puteţi administra făcând click dreapta pe iconiţa aplicaţiei Digi Storage care apare în system tray și alegând "Deschide" sau "Open"
Interfaţa de administrare este identică cu cea din Windows.
Aplicaţia Digi Storage pentru Mac
Pentru a instala clientul desktop pentru Mac, procedaţi astfel:
Conectaţi-vă la aplicaţia web Digi Storage.
În mijlocul meniului vertical veţi observa optiunea "Link this computer" pe care trebuie să faceţi click.
Faceţi click pe "Download" aflată sub Connect your computer.
Dacă doriţi să alegeţi manual sistemul de operare faceţi click pe link-ul "Show other operating systems".
Când se termină downloadul, rulaţi aplicaţia Digi Storage mutând-o (dragging) în folderul aplicaţiilor.
Dacă veţi primi eroarea "DigiStorage is an application downloaded from the Internet. Are you sure you want to open it?" faceţi click pe butonul
 .
.Aplicaţia va porni în background și o puteţi administra făcând click dreapta pe iconiţa aplicaţiei Digi Storage care apare în system tray și alegând "Deschide" sau "Open".
Interfaţa de administrare este identică cu cea din Windows.